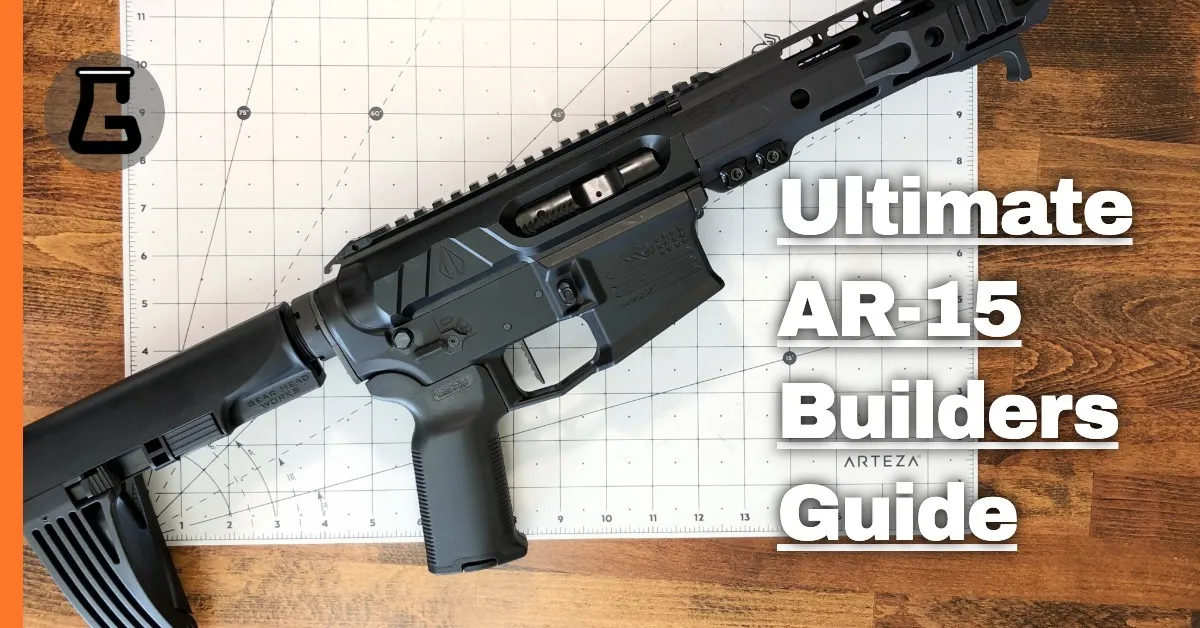
How do you build an AR-15?
You build an AR-15 by assembling two halves, the lower receiver and the upper receiver, and pinning them together. You need a stripped lower, a lower parts kit, a buffer kit and stock, an upper receiver with barrel, gas system and handguard, a bolt carrier group and a charging handle. With roll-pin punches, a hammer and an armorer's wrench, most first-time builders finish in an afternoon.
The stripped lower is the serialized part the law treats as the firearm, so you buy it through an FFL dealer like any gun; the rest of the parts ship to your door. Some states restrict parts and features, so check your state's laws first.
Plan your build in our AR-15 builder: pick each part, check that it fits, and see the best price for every one.
Tools & Parts
What tools do I need?
If you’re considering that you might do a complete build in the future, then it’s recommended to just buy the tools now. It will save you from the expense later, and you’ll have the tools to perform maintenance on the rifle you currently have. Tools such as the telescoping stock wrench are integrated within the Armorer’s wrench. Buying both is not necessary.
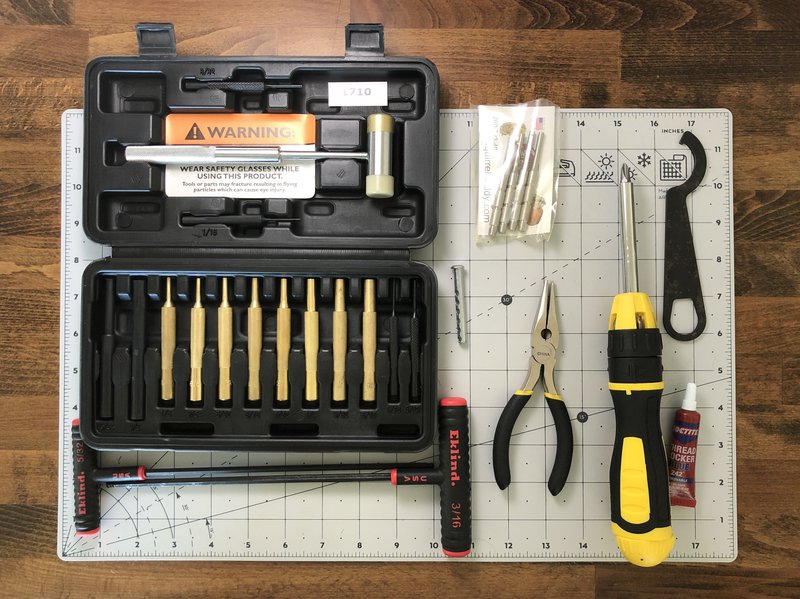
Tools for a Kit Build:
- Roll Pin Punches (3/32", 1/8", 5/32")
- A flathead screwdriver and/or allen key
- Hammer
- Needle nose Pliers
Tools for a Complete Build:
- Roll Pin Punch (1/16")
- A vice
- Action block
- Barrel or Armorer's wrench
Recommended, but not necessary Tools for a Complete Build:
- Gas tube pusher
- Snap-Ring pliers
- Pivot Pin Detent tool or razor blade
- Universal Clevis Pin (can be found at your local hardware store for under $0.50)
What parts do I need to build an AR-15?
| Part | What it does | Budget | Typical |
|---|---|---|---|
| Stripped lower receiver | The serialized frame everything attaches to | $95 | $265 |
| Lower parts kit | Trigger group, mag catch, bolt catch, pins and springs | $25 | $60 |
| Buffer tube kit | Buffer tube, buffer, spring, castle nut and end plate | $20 | $55 |
| Stock | Fixed or adjustable stock on the buffer tube | $35 | $75 |
| Upper receiver | Holds the barrel and bolt carrier | $60 | $150 |
| Barrel (5.56) | Includes the barrel nut on most kits | $150 | $240 |
| Gas block and gas tube | Sends gas back to cycle the action | $30 | $100 |
| Handguard | Covers the barrel; M-LOK or KeyMod for accessories | $30 | $185 |
| Bolt carrier group | The bolt and carrier that fire, extract and reload | $120 | $180 |
| Charging handle | Pulls the bolt back to chamber a round | $35 | $80 |
| Muzzle device | Flash hider, brake or compensator | $15 | $70 |
| Total, parts only | ≈ $600 | ≈ $1,450 | |
| Red dot or optic | If your upper has no sights | $75 | $290 |
Compare today's prices: lower receivers · lower parts kits · buffer kits · stocks · upper receivers · barrels · gas blocks and tubes · handguards · bolt carrier groups · charging handles · muzzle devices · optics, or price your whole build in the AR-15 builder.
Prefer fewer steps? A complete upper (barrel, gas system and handguard already installed) is about $265 budget / $745 typical and skips the upper assembly below.
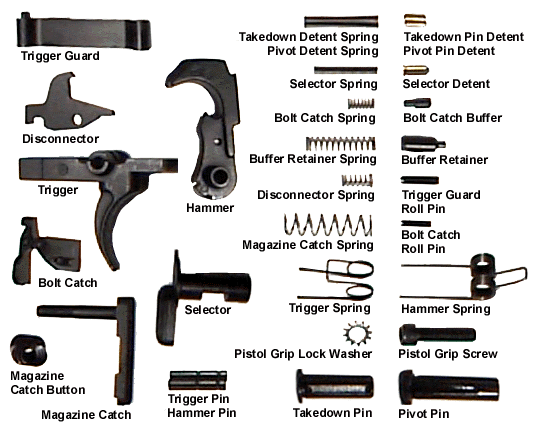
What's in a lower parts kit?
- Trigger Guard
- Disconnector
- Trigger
- Bolt Catch
- Magazine Catch Button
- Magazine Catch
- Hammer
- Selector
- Trigger and Hammer Pins
- Takedown and Pivot Detent Springs
- Selector Spring
- Bolt Catch Spring
- Buffer Retaining Spring
- Disconnector Spring
- Magazine Catch Spring
- Trigger Spring
- Hammer Spring
- Pistol Grip Lock Washer & Screw
- Takedown Pin
- Pivot Pin
- Bolt Catch Roll Pin
- Trigger Guard Roll Pin
- Buffer Retainer
- Bolt Catch Buffer
- Selector Detent
- Takedown and Pivot Detents
How much does it cost to build an AR-15?
A parts-only build starts around $600 with budget parts and lands around $1,450 with mid-range parts, before an optic. Building rarely beats the price of the cheapest factory rifle, but you choose every part: the barrel length, trigger, handguard and stock you actually want. See what other builders spent in our completed builds, or price your own parts list in the AR-15 builder.
Lower Receiver Assembly
Lay out the parts
Before starting any project, be sure to layout the parts and make sure you have everything you need. Do the same with your tools. Starting a project and finding out halfway through it, that you don't have the tool you need could pose a problem. On one hand, you could wait until you find, locate, or acquire the tool, or on the other hand you could make due with what you have. Doing the latter poses a great risk and many AR's have been messed up by people being impatient without proper tooling. Take this step seriously.
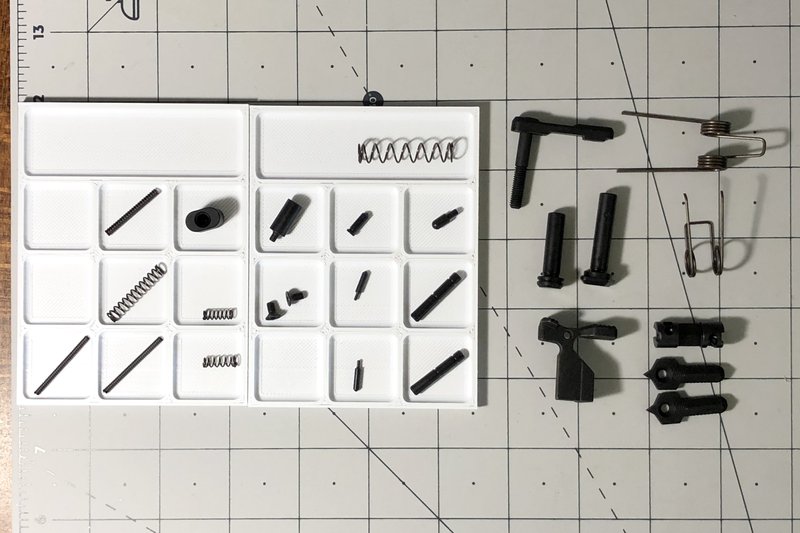
All parts will be coated with protective grease. Prior to installation, make sure to clean off this protective grease and coat with a lubricant of your choice. I used BreakFree CLP for this installation. All parts will have very tight tolerances. However, nothing should have to be overly forced into place. If something is not going right, then stop, take another look at the guide, figure out what isn't going right and then start again. The key element to any successful build is PATIENCE. The only parts that need to be hammered into place are the two roll pins.
Step 1. The Magazine Catch
First you insert the Mag Catch Spring into the hole shown. The next step is to insert the Magazine Catch into its hole on the opposite side. Then proceed to stick the Mag Release Button into its proper hole shown and depress it down until the threads of the Magazine Catch meet the button. Push the button into the hole. This will create spring tension and push the Magazine Catch out the other side. The goal is to thread the Magazine Catch onto the button.
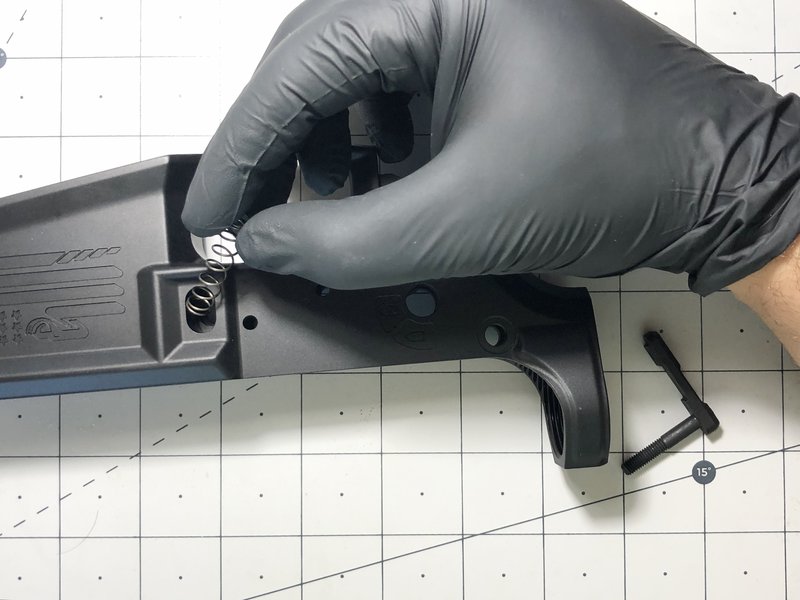
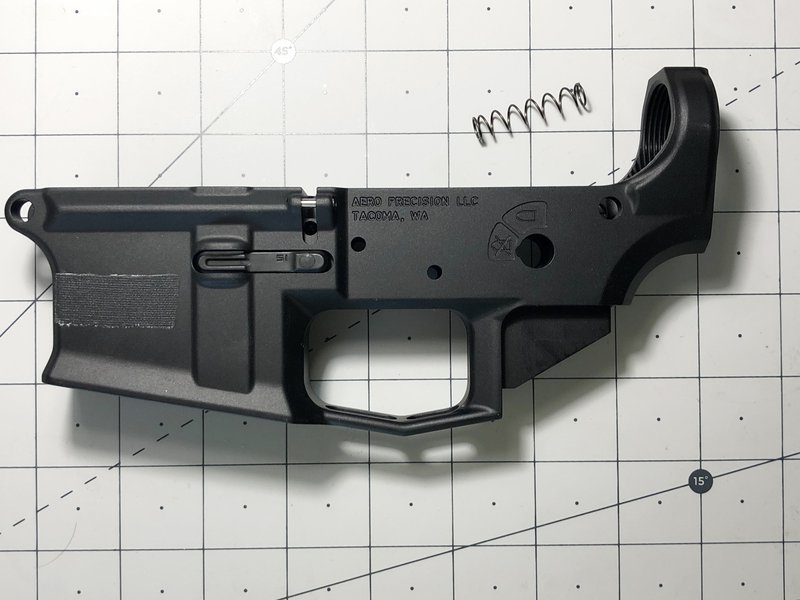
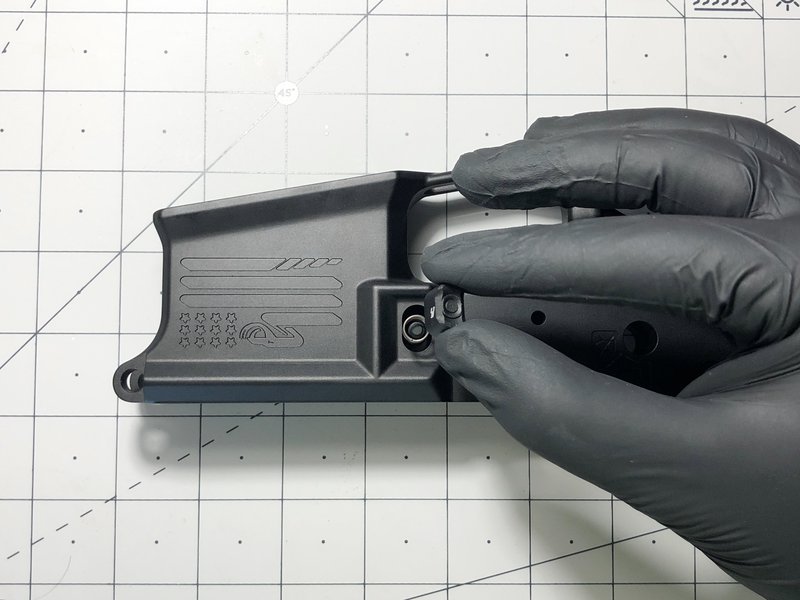
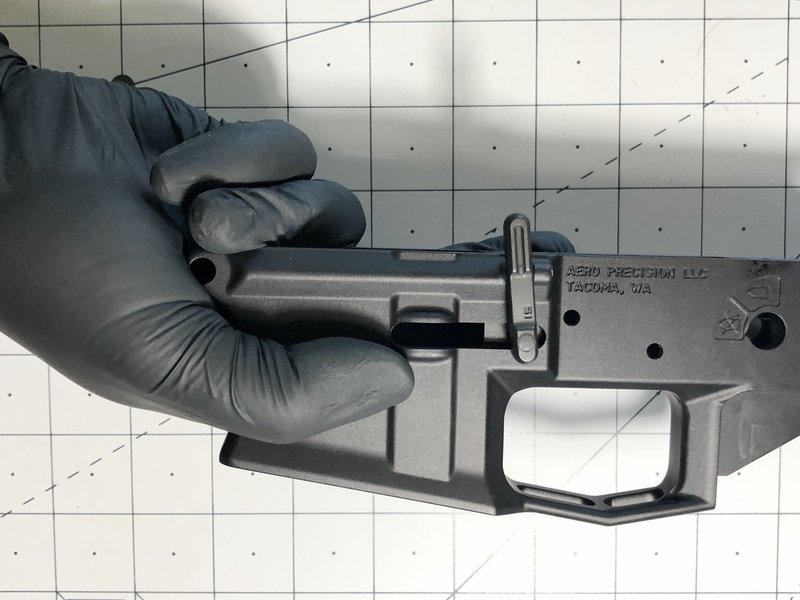
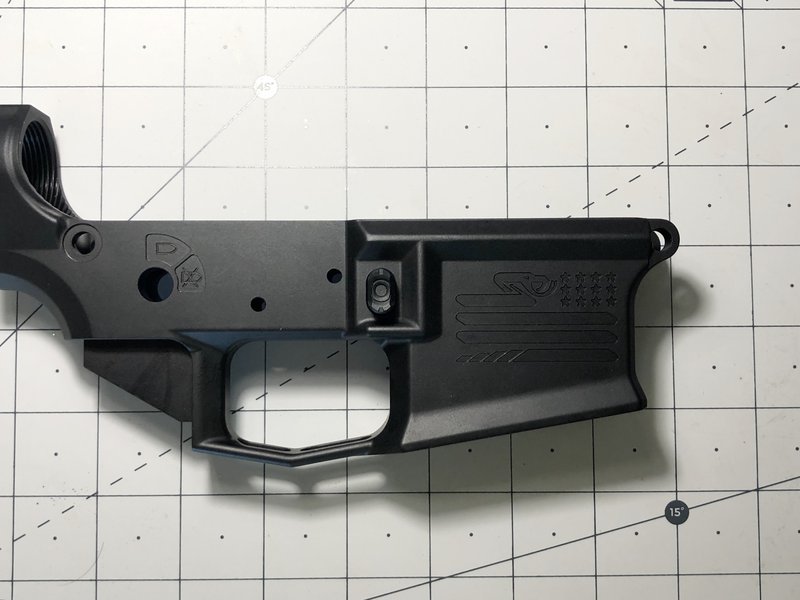
Once the Magazine Catch is threaded onto the Mag Release Button, you can take a punch (one of the larger ones) and depress the button downward. Rotating the Magazine Catch clockwise will thread it into place. Keep doing this until the threads of the Magazine Catch are flush with the top of the hole on the button. This can be seen in the photo below.
Step 2. The Bolt Catch
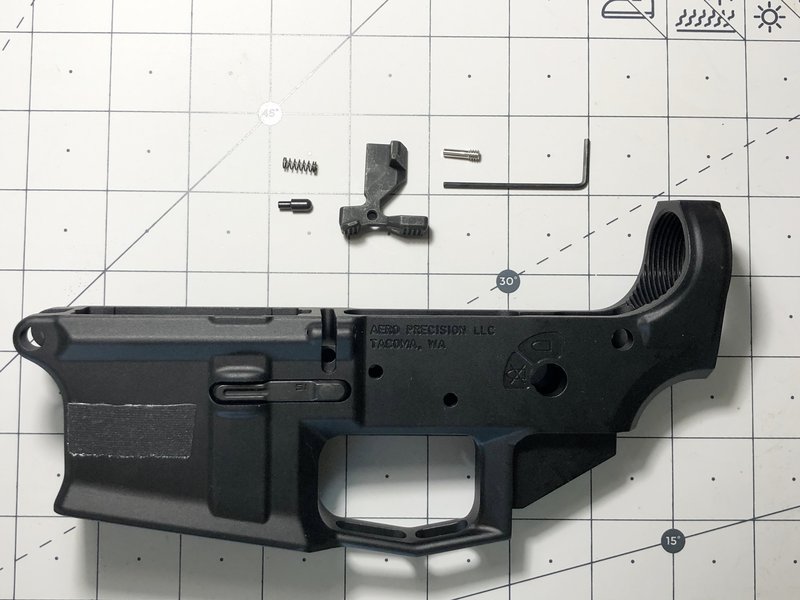
Insert the Bolt Catch Spring into proper hole on the receiver as shown. Insert the Bolt Catch Buffer onto the Bolt Catch Spring.
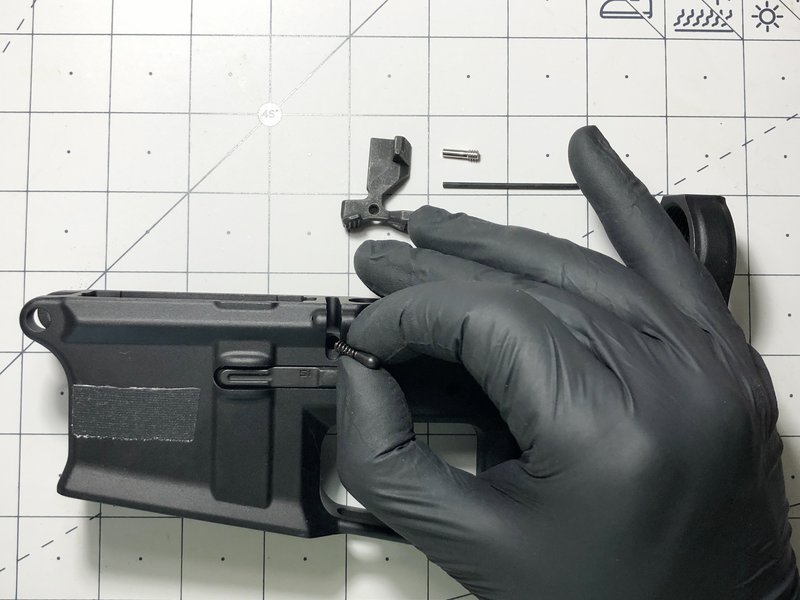
Insert the Bolt Catch and add a little pressure to align the screw within the hole of the bolt catch. On M4E1 receivers, you can now screw in pin which will lock it all in place.
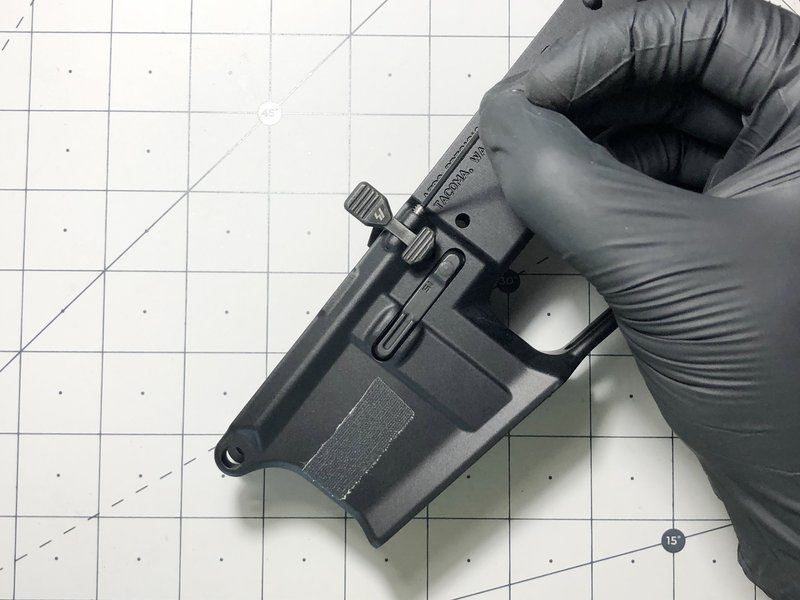
If you are using a traditional receiver with a roll pin, then this step is best done with the receiver vertical. Place the Bolt Catch Roll pin into its proper spot, and give it 1 or two taps with the roll pin punch and a hammer to start it in the hole.
The next part is best done with some form of protection on the receiver. Masking tape, duct tape or a plastic Ziploc bag work nicely for protecting the finish. You will have to line up the Bolt Catch with one hand while tapping the roll pin in with the other. This job requires 3 hands to be done effectively and is sometimes best done with a 2nd person. Once you get the roll pin going and everything is lined up, you can stand it vertical again to finish it the rest of the way. Don’t push it too far through though.
The finished product will look like this.
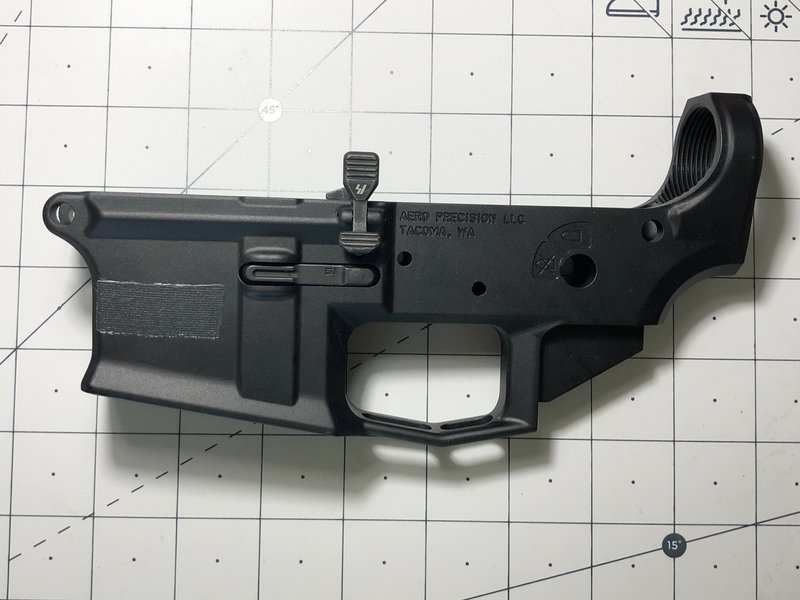
Step 3. The Trigger Guard
The easiest way to complete this step is to position the "ears" of the receiver onto a box or book for support. Find the roll pin and use the (1/8") punch. Go SLOW on this step. Without the receiver on a support, and going too fast could result in breaking the ears off your receiver. That would be bad. Give the pin solid hits, but don't take large swings at it. It will gradually move into place. Once the roll pin is in place, rotate the trigger guard forward, and the front part will snap into place with a spring loaded pin that comes preinstalled on the trigger guard.
Step 4. The Pivot Pin
TIP: Do this step in a 1 gallon Ziploc bag. If parts fly, and they will for a first timer, then they will be isolated in Ziploc bag. This saves time. Otherwise you'd be hunting a very tiny piece that's now located several feet away and buried in the carpet. A Razor blade works well to hold the pin in place during installation, and a Pivot Pin Detent Installation Tool works even better. However, the most cost effective tool I have found is a universal 1/4'' clevis pin that can picked up from your local hardware store for less than $1.
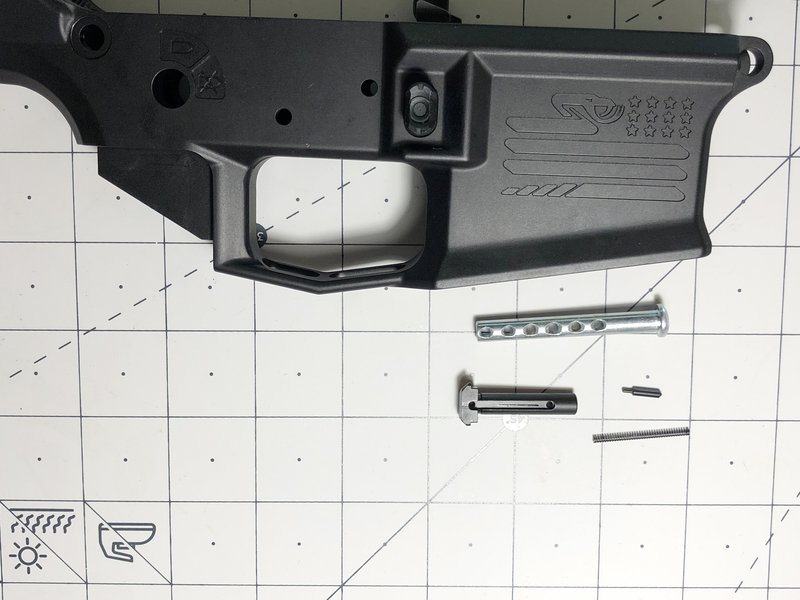
First insert the Detent Spring and Detent into the hole of the clevis pin.
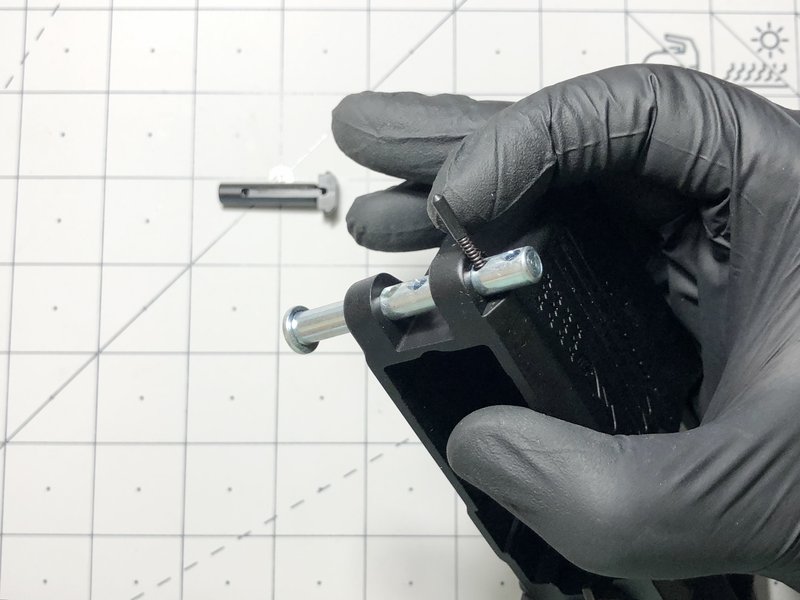
Then use an allen wrench to compress the detent and spring into the receiver while turning the clevis pin.
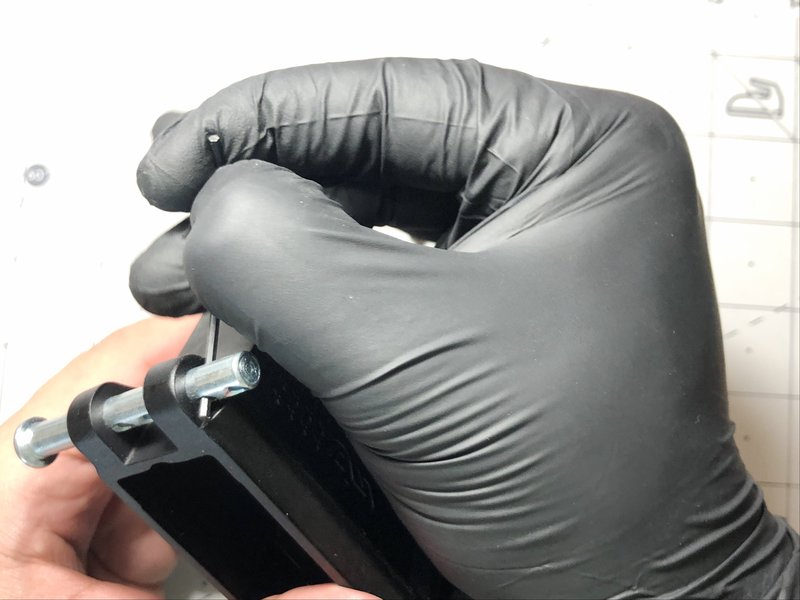
Next, align the Pivot Pin with the end of the clevis pin and prepare to push the Pivot Pin into the holes of the receiver. Make sure the ridge of the Pivot Pin is on the bottom for Detent to lock into. Keep a finger with pressure on the seam of the two pins while you push the Pivot Pin through.
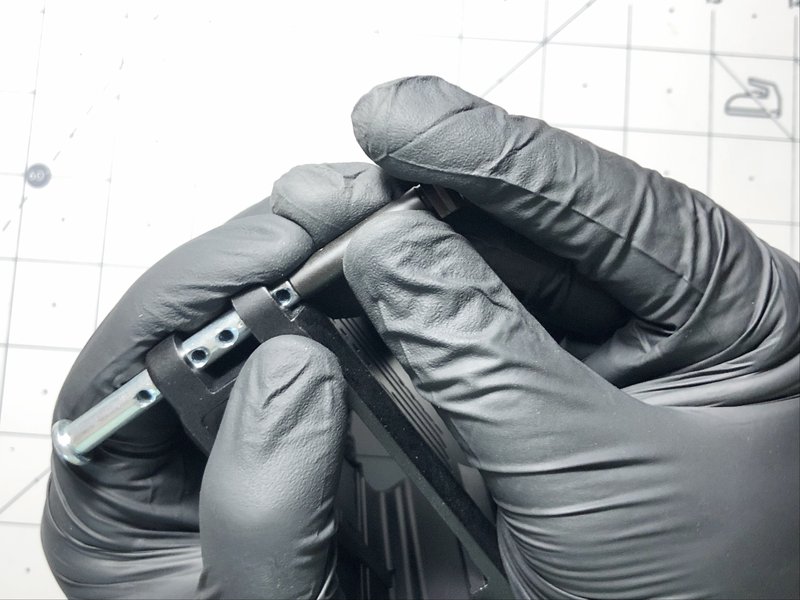
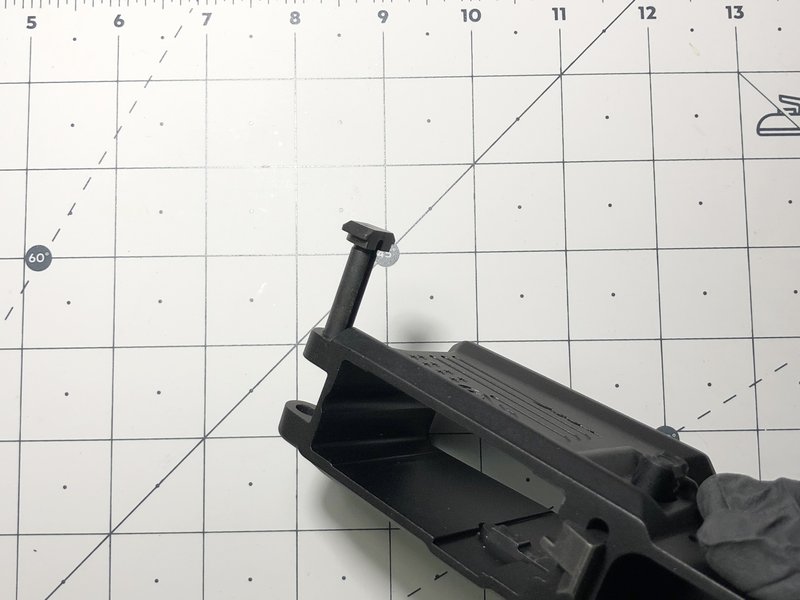
Finished Pivot Pin
Step 5. The Trigger
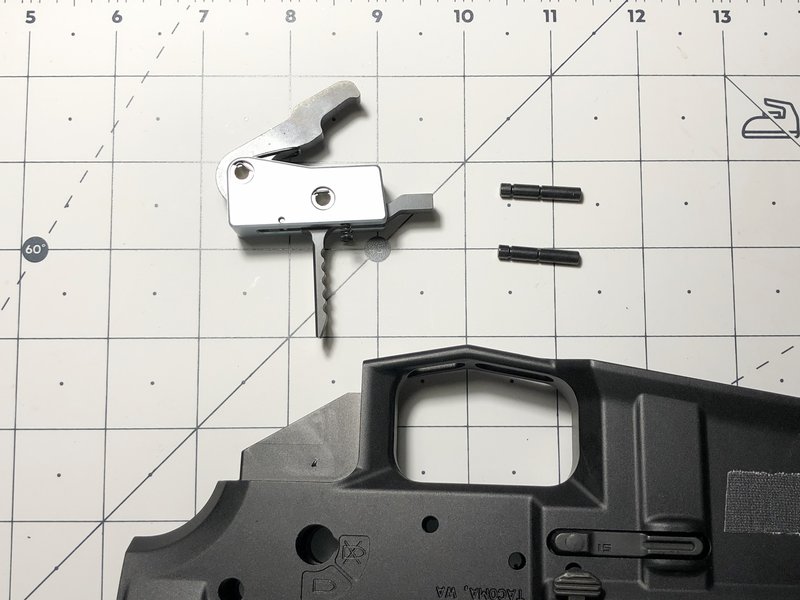
Drop in Triggers
When installing drop in trigger assemblies, it really couldn't be any easier. Make sure to insert the assembly in the correct orientation, while applying a little pressure to align the trigger pin holes with the receiver.
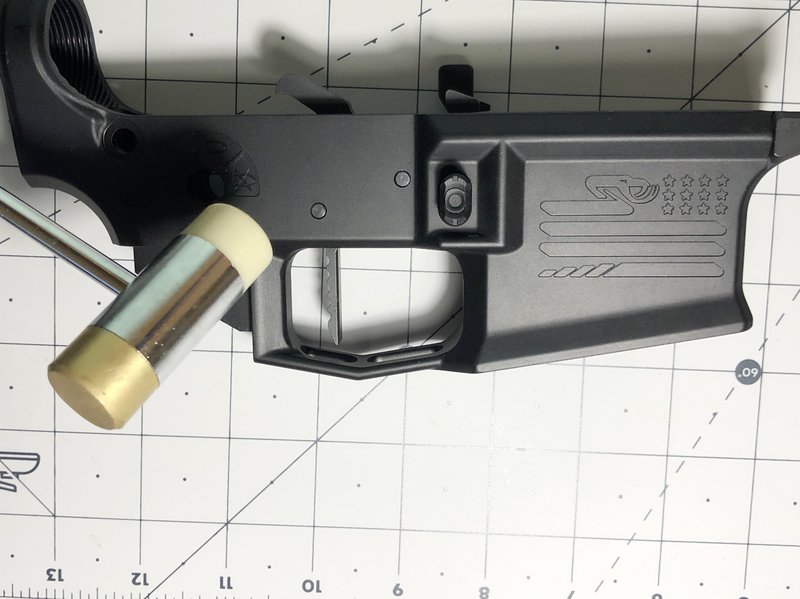
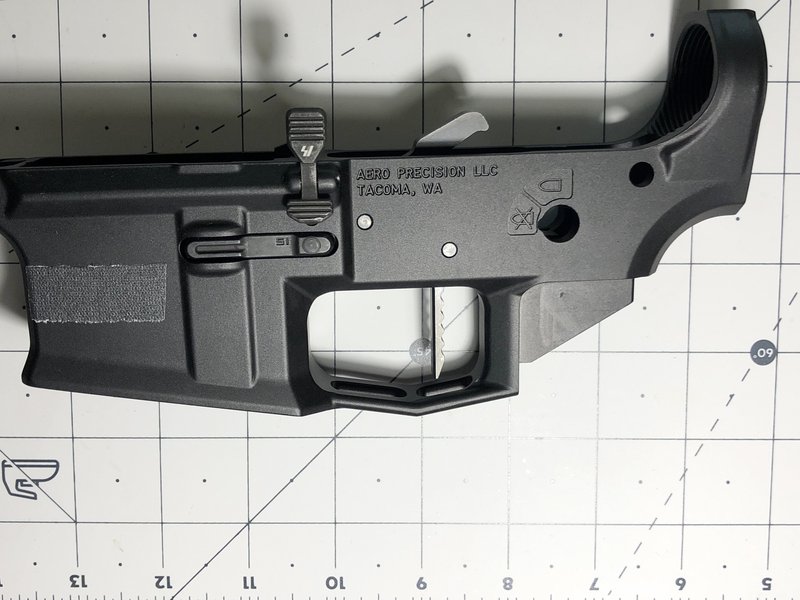
Once the holes are aligned, lightly hammer in the trigger and hammer pins. These should go in fairly easy, so if they aren't going in after a few taps, make sure the holes are aligned and try again.
Step 6. The Safety Selector and Pistol Grip
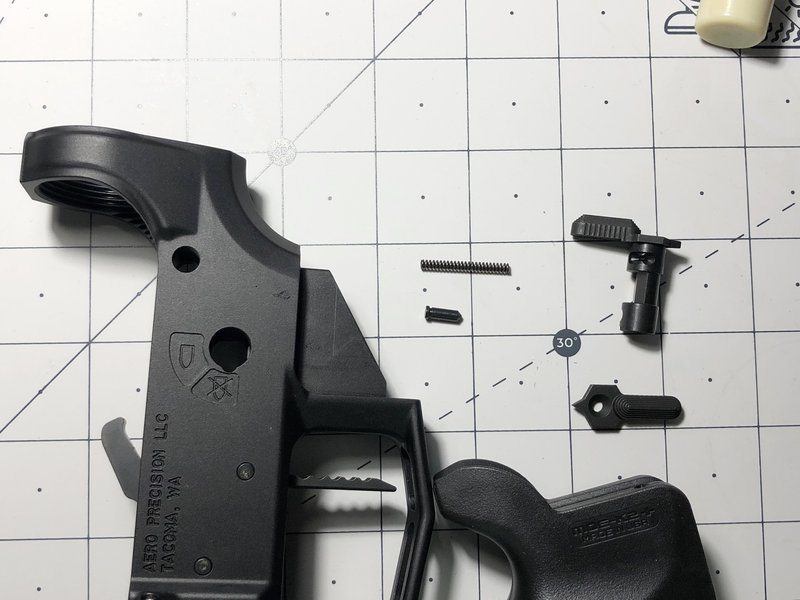
Insert the Selector Switch into the proper hole, as shown.
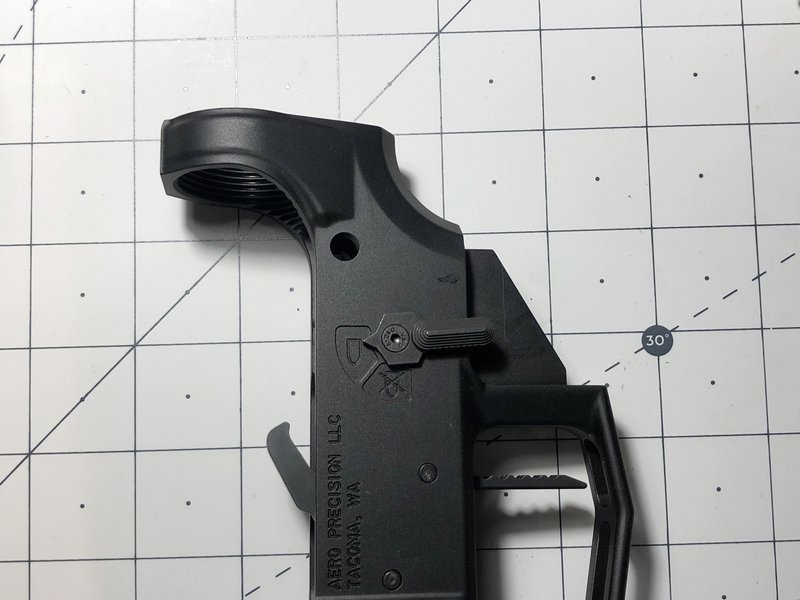
Flip the receiver over and insert the Selector Detent, point side down, so that the base of the pin fits nearly flush, as shown.
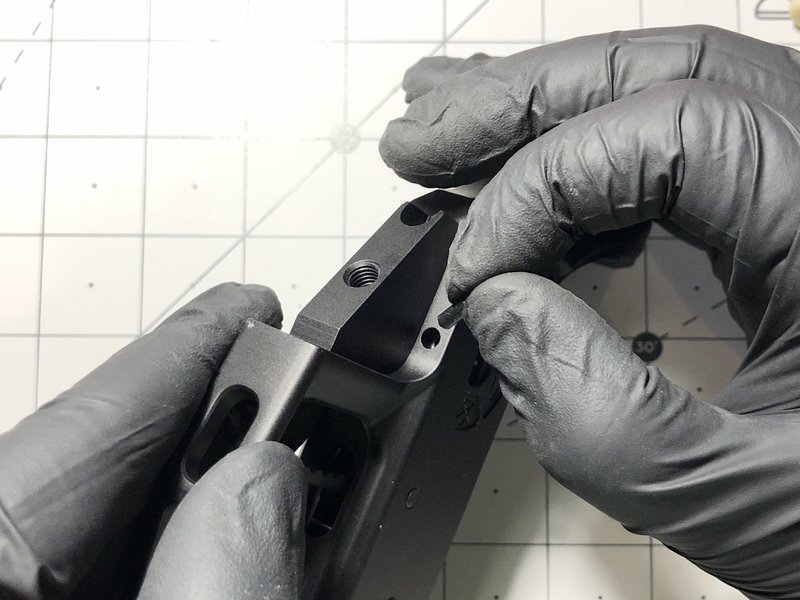
Insert the Selector Spring into the Grip hole, and wiggle the grip onto the receiver, lining the spring up with the Selector Detent hole.
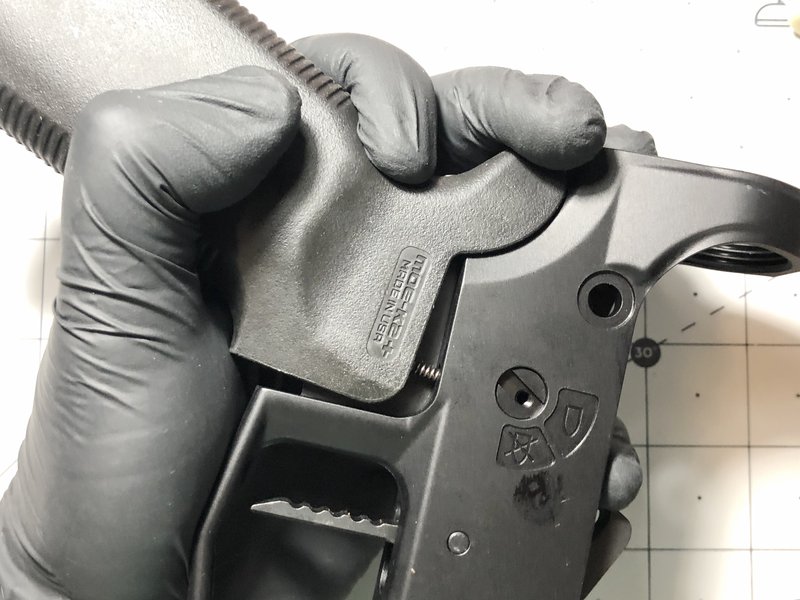
Push the grip down fully. Find the Grip Screw and make sure the washer is in place. The Grip Screw may either require a flathead screwdriver or an allen key depending on the make of the Lower Parts Kit.
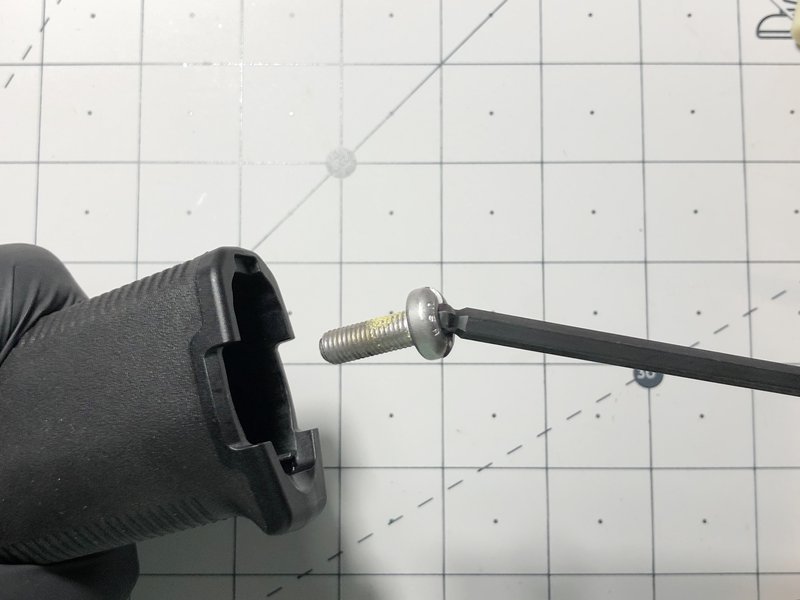
If you have an ambidextrous safety switch, now you can install the other side. Depending on the kit you have, it should only be one other screw. Then you are all done.
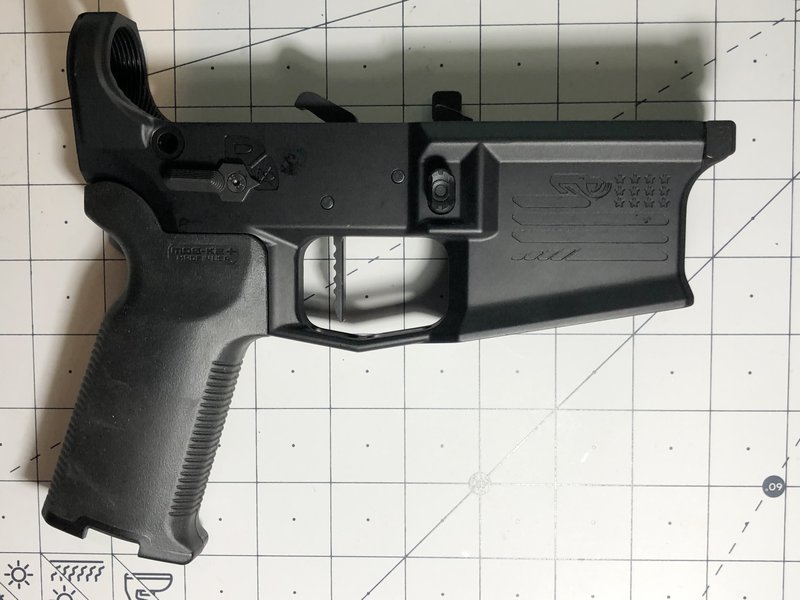
Step 7. Buffer Tube and Stock Assembly
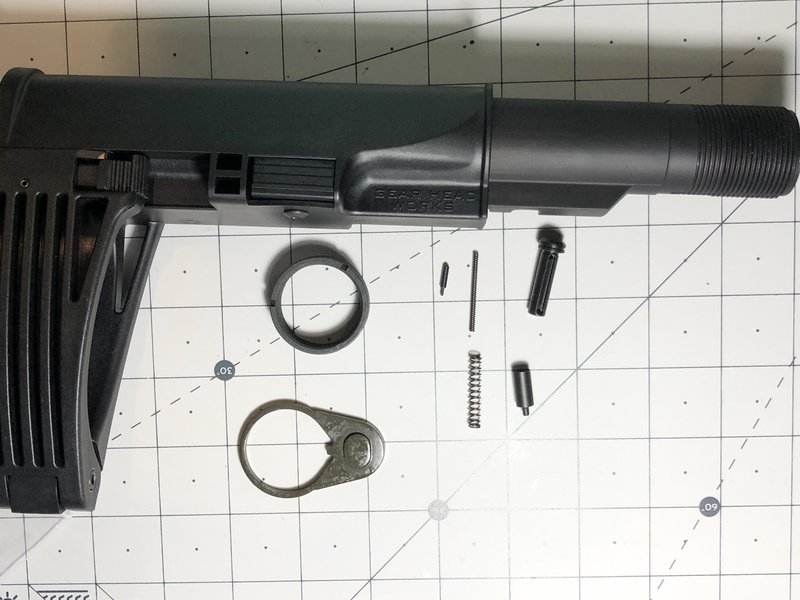
Thread the castle nut on with the notches outward, and place the retainer plate on the buffer tube with the dimple inward towards the receiver.
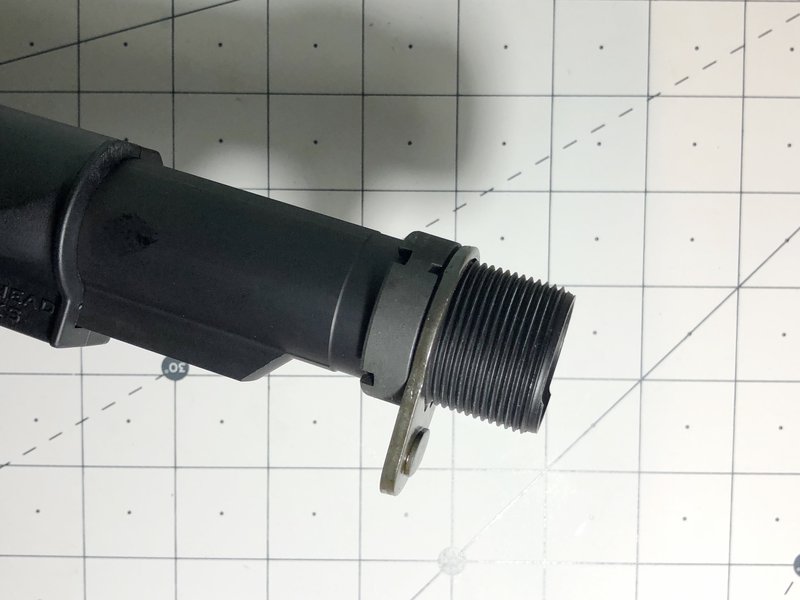
Thread the buffer tube onto the receiver. Screw it on for a couple turns, but nothing more.
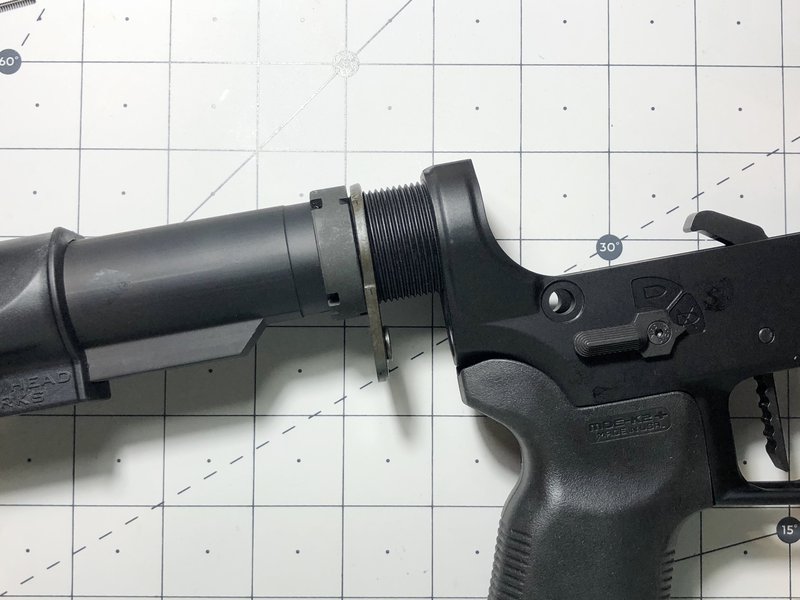
Insert the Buffer Retaining Spring into the Buffer Retainer.
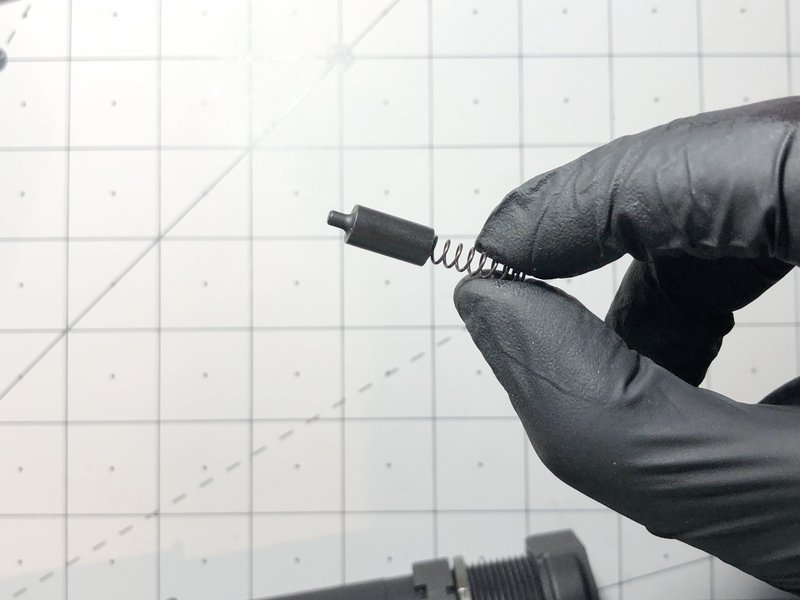
Insert the Buffer Retaining Assembly into the receiver as shown. (Spring side down)
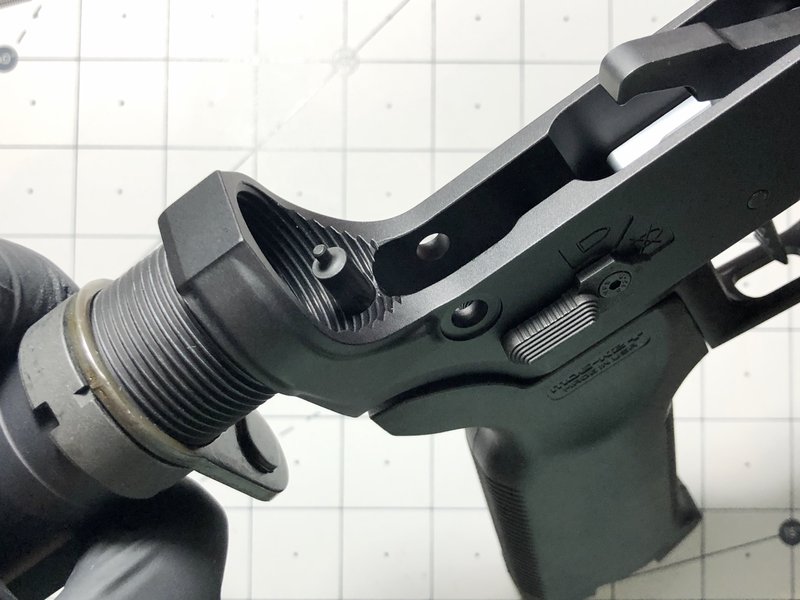
Depress the Buffer Retaining Assembly into the receiver while continuing to screw the Buffer Tube onto the receiver. Continue to do this until you can longer do so.
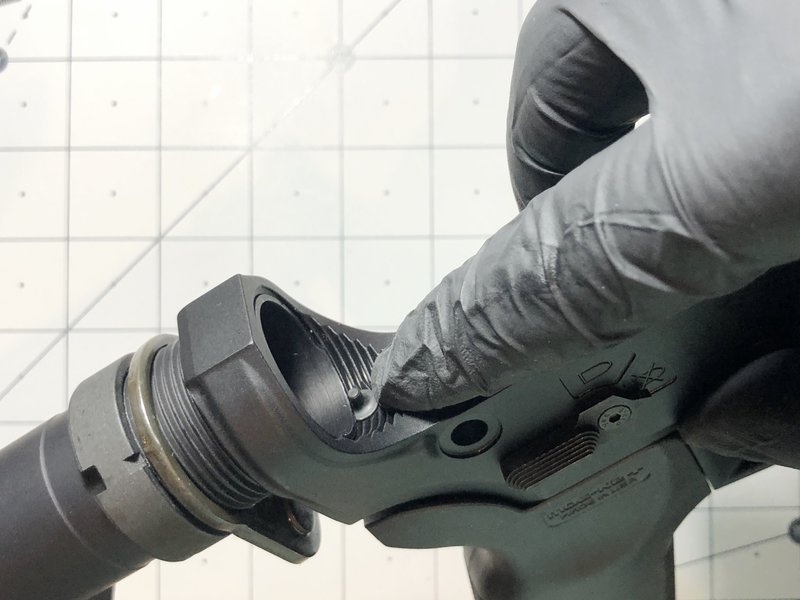
The next step is to place the Rear Takedown Pin into its hole. Make sure the side with the internal groove is facing rearward.
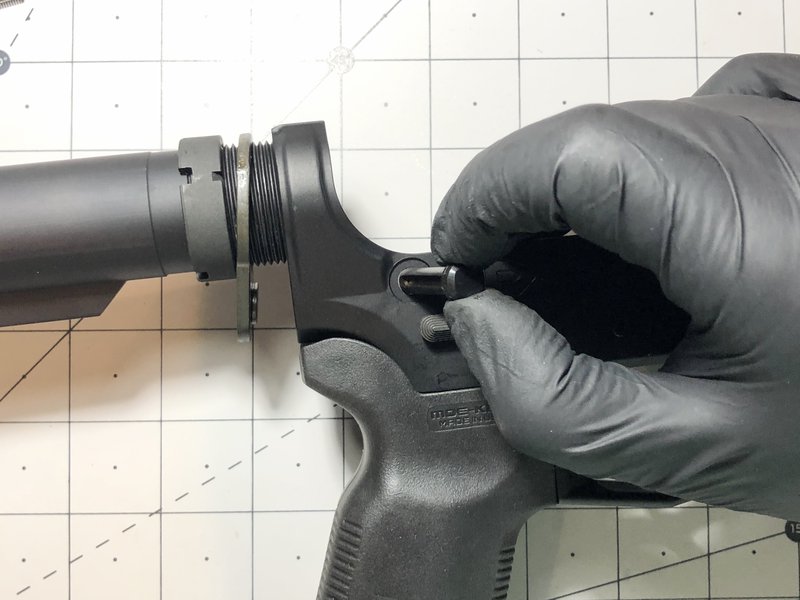
Insert the Takedown Detent Pin (pointed end first) into the hole at the rear of the receiver. Insert the spring next.
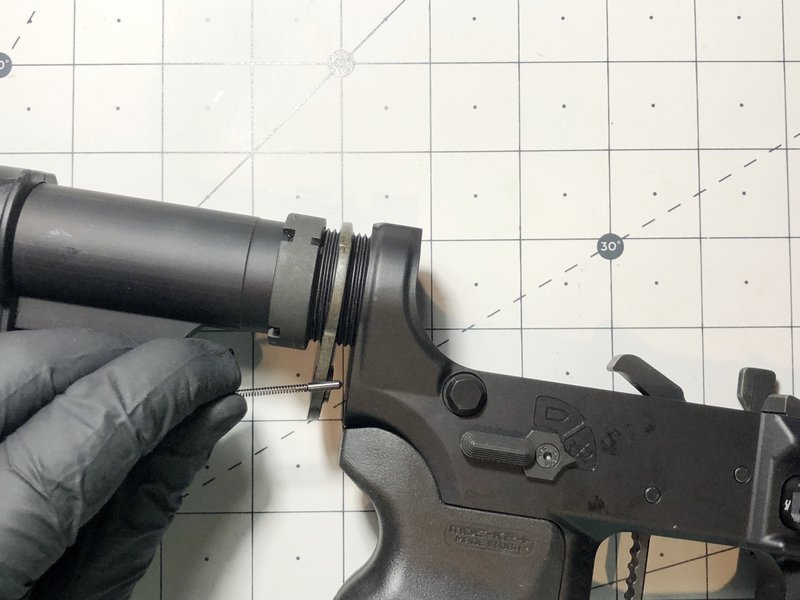
Line up the retainer end plate, slightly compressing the spring.
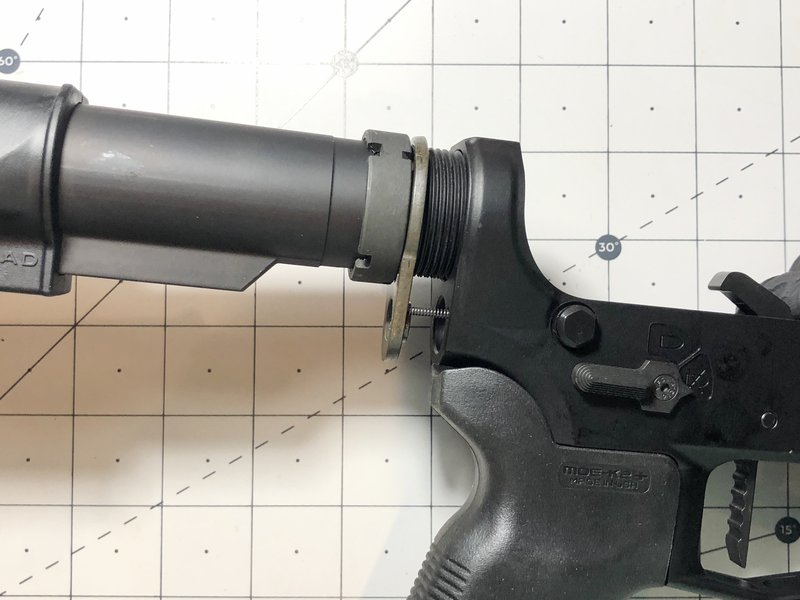
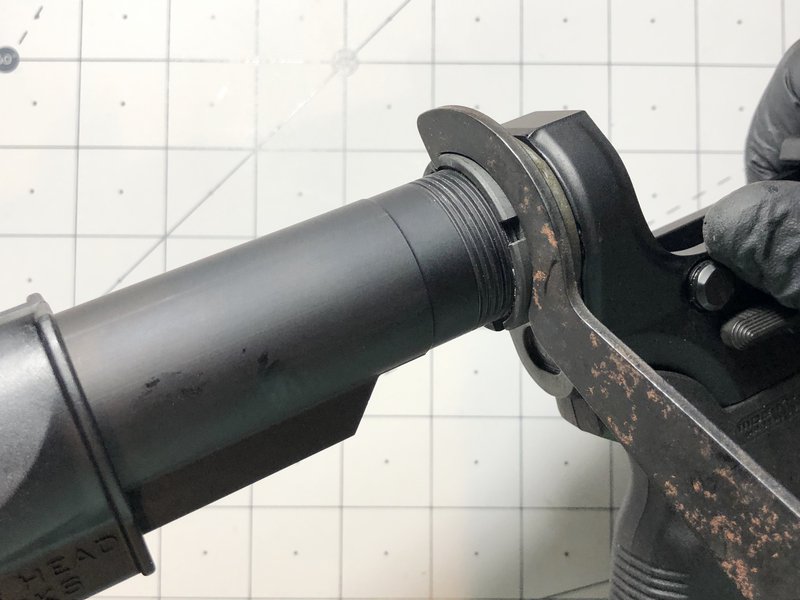
Start to tighten the castle nut by hand, and keep pressure on the end plate making sure not to bind the spring. Once the castle nut is hand tight, use a castle nut wrench to finish tightening the rest of the way.
The last step is to add your buffer and spring into the assembly, spring first. I am using an all in one recoil spring from Armaspec, but the idea is the same.
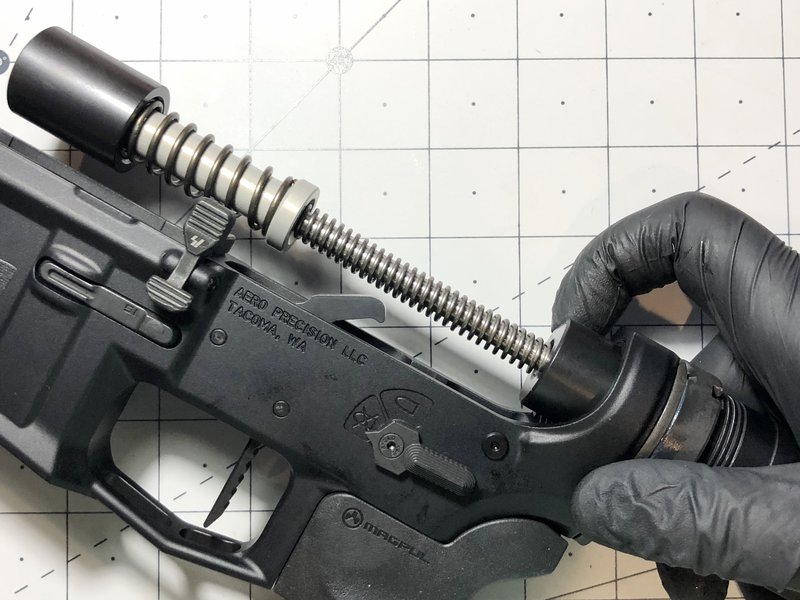
The finished product.
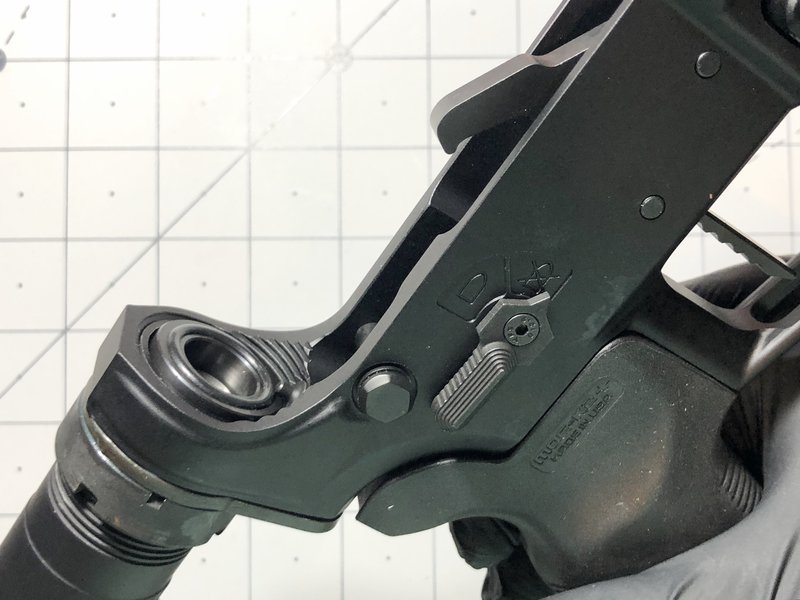
Upper Receiver Assembly
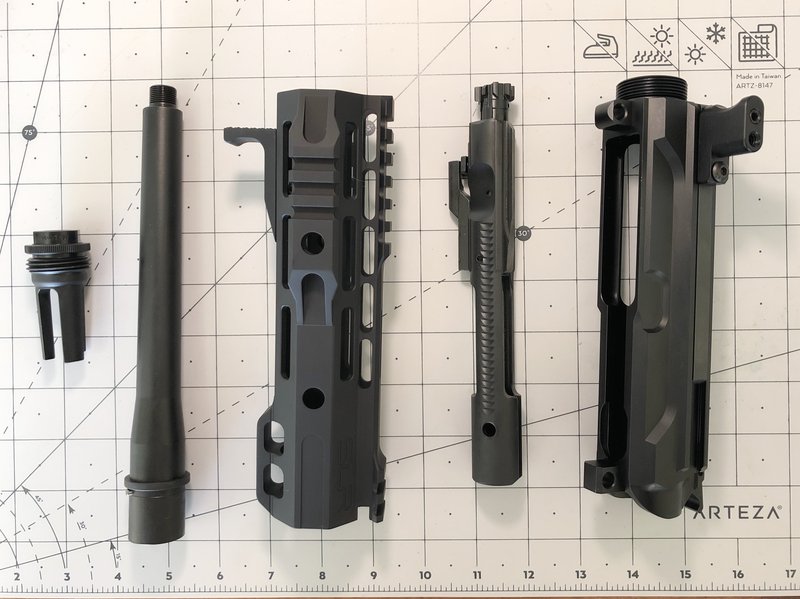
Lay out the parts
Same as with the lower assembly, it is always good to lay out all your parts before you get started. Make sure to have all tools that you will need handy, as you don't want to be stuck in the middle of an install and not have the right tool.
Step 1: Install the Barrel
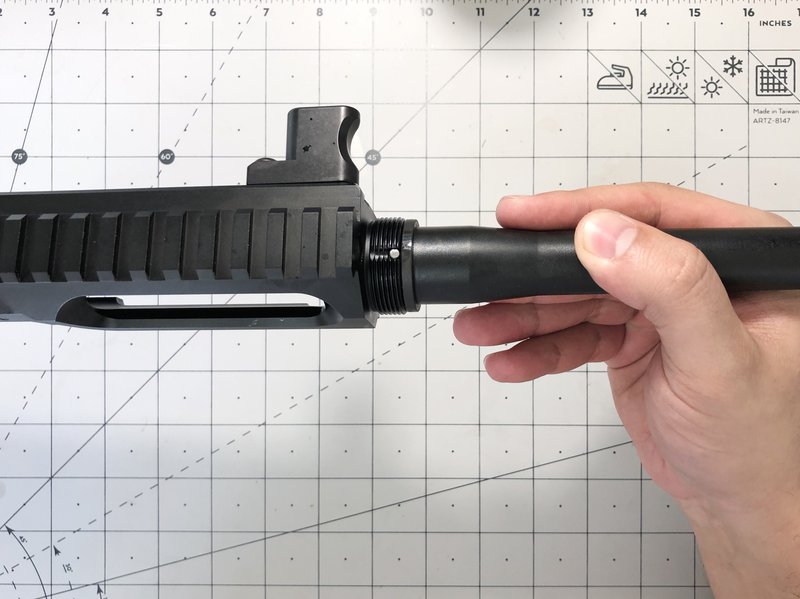
Insert your barrel into the receiver. If there is extreme resistance, then remove the barrel and rub steel wool on the outside of the barrel, where it will slip into the receiver.
Sometimes the parkerization can be a little thick.
Coat the threads with a form of moly based grease (NOTHING WITH A GRAPHITE ADDITIVE!) to prevent any form of seizing from occurring.
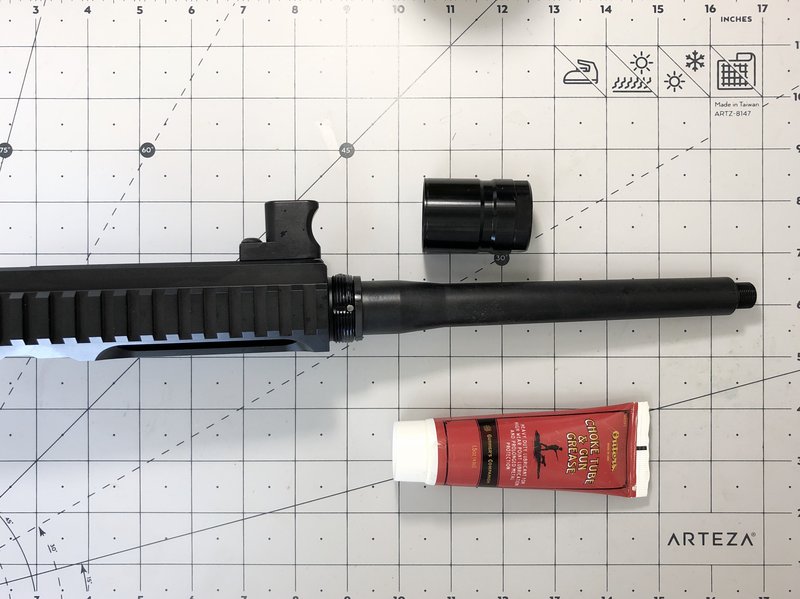
Screw the barrel nut onto the receiver threads until hand tight. Using a torque wrench and adapter if your barrel needs one, torque the nut to ~ 30 ft lbs. A rule of thumb is to tighten the barrel till it's hand tight, then tighten the nut until the next slot on the barrel nut aligns with the indexed snap ring and spring holes. If you don't have a torque wrench, then make sure the nut is tight, but make sure not to strip any of the threads.
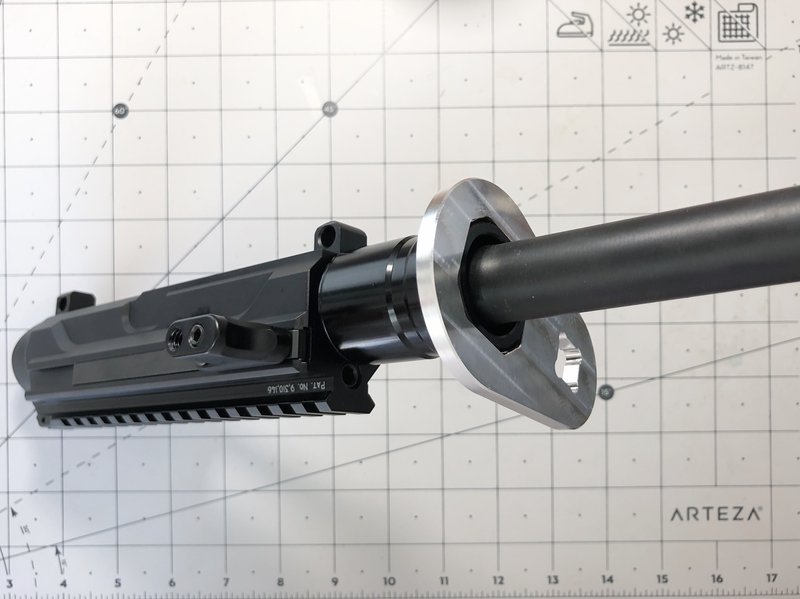
Step 2: Gas Block and Tube
Since I am building an AR-9 in the pictures, no gas system is necessary for me. However, if you are building an AR-15, you cannot skip over this step.
Attach the gas block onto the barrel making sure the side with the hole is facing the receiver. Add the gas tube into the gas block and guide it into the hole in the receiver right above the barrel nut. Go all the way back to the notch in the barrel, about a third of the way until you can't go anymore.
Tighten any screws that lock your gas block into place. Insert the Gas Tube Roll Pin and tap it into place.
Step 3: Handguard
If you are using a free-float handguard, it will most likely be similarly installed like below. First, fit the handguard over the barrel onto the barrel nut. If your handguard has an anti-rotation tab, line it up correctly.
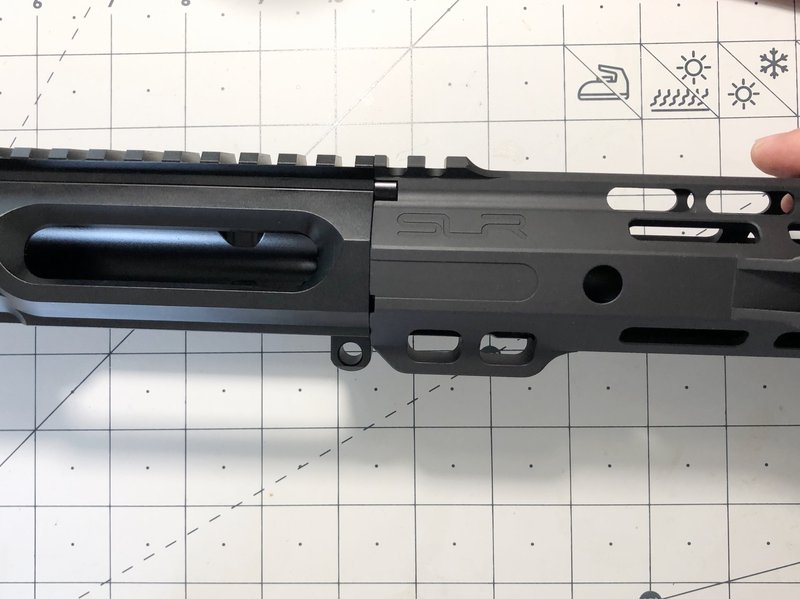
Add the retention wedges and start to screw in, joining the two sides. I like to use Loctite as the vibrations from the gun can loosen these over time.
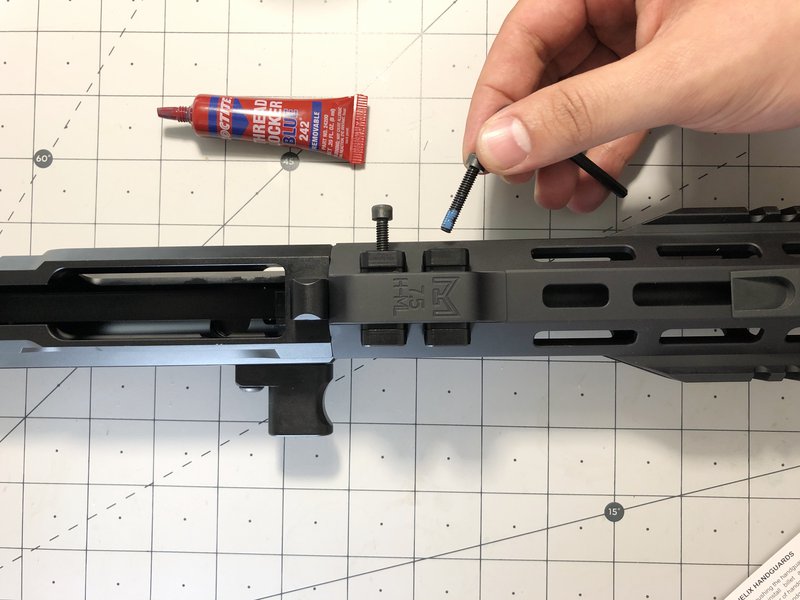
Make sure your handguard and receiver is correctly aligned, and tighten the screws completely. End result should look like this.
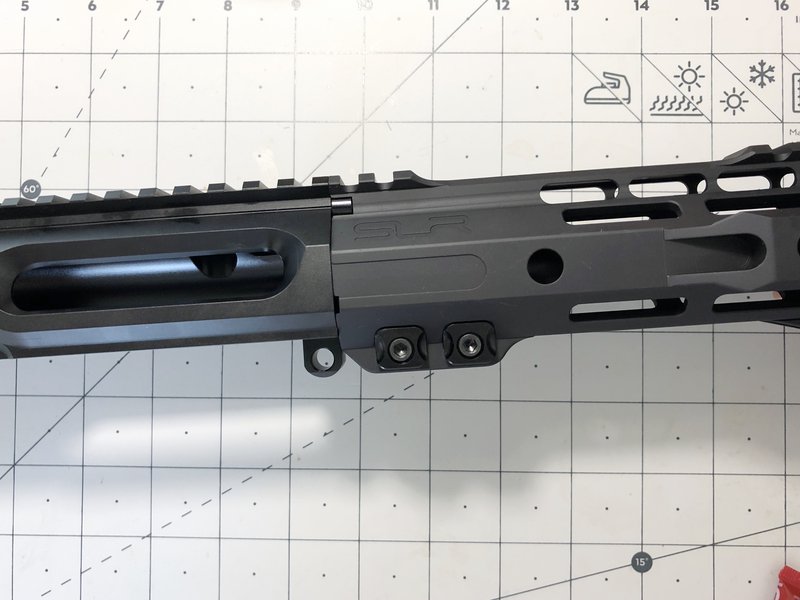
Step 4: Muzzle Device
You want to start off by applying a high heat resistant thread locker such as Rockset. Loctite Blue is not rated to as high temperatures that the muzzle device will incur.
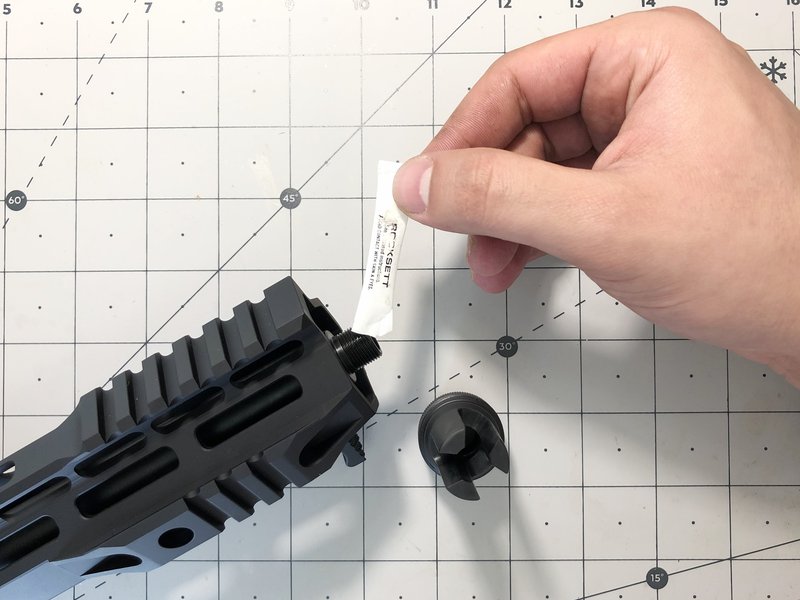
Start screwing on the muzzle device until it is hand tight. Finish up with a wrench and make sure to really tighten it so it doesn't loosen up while firing.
Step 5: Charging Handle and Bolt Carrier Group
Insert the Charging Handle into the rear of the upper receiver. If you are using a side charging receiver like me, you can skip this step. Just make sure to replace the required Cam Pin on you BCG. Next just add your BCG into the back of the receiver and push all the way forward.
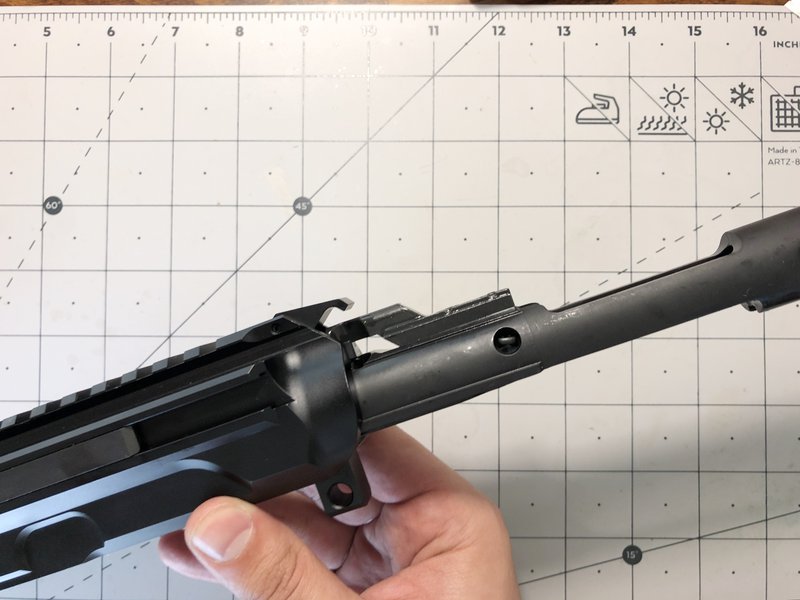
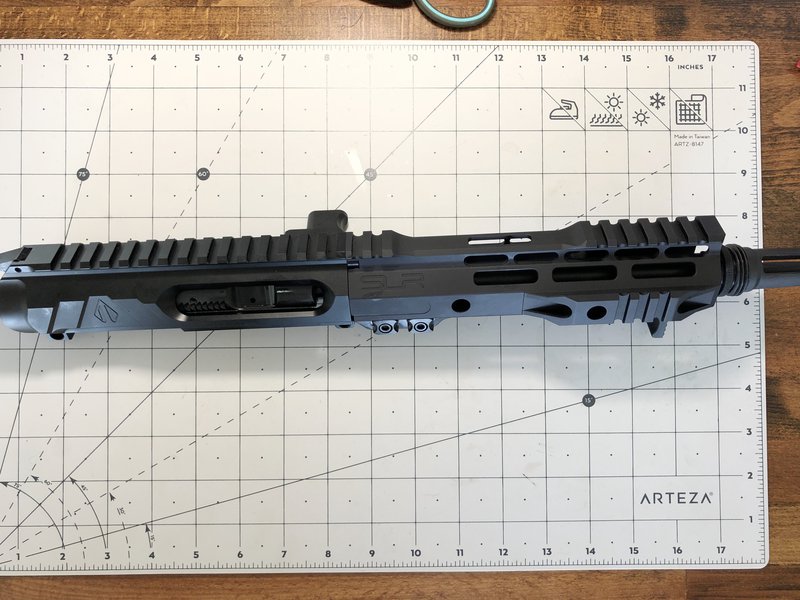
You have now finished the Upper Receiver.
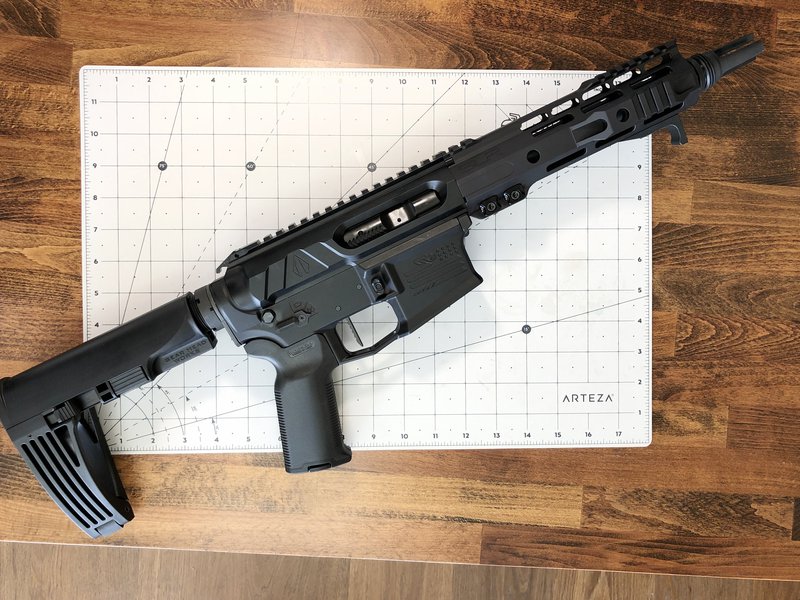
Complete the Build!
Attach both the completed Lower and Upper receivers by locking the take down pins. You are now complete! Next thing to do is to pick up some quality ammo and test out your new build. It is always good to bring some tools on your first range trip in case you need to tweak anything. One of the greatest things about building your own gun is knowing it from the inside out. If something starts acting up, you now have the knowledge to disassemble and tackle the issue head on.
Ready to start? Plan your build part by part in our AR-15 builder: it checks that the parts fit and shows the best price for each one.
Frequently asked questions
What parts do you need to build an AR-15?
A complete AR-15 build needs a stripped lower receiver, an upper receiver, a lower receiver parts kit, a bolt assembly, a charging handle, a gas block and gas tube, a barrel with barrel nut, a handguard, a stock assembly, a buffer and buffer spring, and a sight or optic if the upper does not include one.
What tools do you need to build an AR-15?
For a kit build you need roll pin punches (3/32", 1/8", 5/32"), a flathead screwdriver or allen key, a hammer, and needle-nose pliers. A complete build also needs a 1/16" roll pin punch, a vise, an action block, and a barrel or armorer's wrench. A gas tube pusher and snap-ring pliers are helpful but optional.
Is building your own AR-15 hard?
It is very doable with patience. Lay out all parts and tools first, clean the protective grease off parts and lubricate them, and never force anything — only the two roll pins should be hammered in. If something is not going right, stop and recheck rather than forcing it.
Should you clean and lube AR-15 parts before assembly?
Yes. New parts come coated in protective grease. Clean it off and apply a lubricant of your choice (the guide used BreakFree CLP) before installing. Tolerances are tight, but parts should not need to be forced into place.
What is the trickiest part of assembling an AR-15 lower?
Installing roll pins, such as the bolt catch roll pin, is the hardest step — you line up the part with one hand while tapping the pin with the other. Protect the receiver finish with tape, and a second person makes it much easier.
How long does it take to build an AR-15?
Most first-time builders take an afternoon: about 1–2 hours for the lower and an hour for the upper. A second build often takes under an hour.
Do you need an FFL to build an AR-15?
You don't need a license to build an AR-15 for yourself. The stripped lower receiver is the legal firearm, so you buy it through an FFL dealer with a background check; the other parts can be shipped to your home. Check your state's laws first, since some states restrict features and parts.
How much does it cost to build an AR-15?
With budget parts, about $600 before an optic; with mid-range parts, about $1,450. Prices change daily; our AR-15 builder shows today's best price for every part.